RYA Jet Ski Instructor Training
Guest Ice Breaker
The starting point for any form of instruction on board will include a sit-down discussion and completion of any required paperwork needed for operations on board, for example, health declarations and vessel indemnity forms.
Instructing guests is a challenge. Crew will be under pressure so the programme flows from one session to the other with no unnecessary delays. This way training can be completed in one hour.
Top Tip: Run a test session with the crew onboard to look at timings for paperwork completion, video sessions, and the practical flow of training. Making the course flow should involve completing any theory first before moving on to the practical training.
How To Start
We recommend crew select a comfortable area on board (Main Saloon) to meet the guests for the start of training. The instructor will have an opportunity to introduce himself, his experience, timelines, and goals for the day. Guests can complete the paperwork requirements for the yacht such as indemnity forms or health declarations.
Asking questions on health conditions will ensure any medications such as asthma pumps, allergy medication or any other requirement is onboard the tender when running the practical sessions. Understanding the guests’ level of comfort on the water (should they fall into the water during the course,) is also important. We can also have a basic discussion on impact vests and their ability to keep guests afloat to lower any concerns.
Understanding your guest’s previous experience on watercraft during practical sessions will also assist the crew regarding their ability before heading out on the water. These questions will allow the crew to use terminology with experienced boaters and to simplify the terminology (no port, starboard, give way, stand on, etc.) for less experienced boaters.
When the crew completes their risk assessment, (see Risk Assessments and Safety briefing content section coming later on) it is important to check local regulations regarding the minimum age when operating PW (personal watercraft) under the supervision of a responsible crew member onboard.
Before training starts, the crew will have completed a risk assessment of the operating area by taking the following into account:
- Training area: This should be agreed on with the Captain or first officer of the yacht. Where possible, the agreed area should be free from hazards. Any remaining hazards should be clearly identified and all students made aware of their existence.
- Due to the unreliable nature of PW’s, keeping within sight of the main vessel is also recommended.
- Check distances to maintain from beaches and any additional equipment riders may need to wear such as helmets.
- Note the weather for the day.
Next, we recommend the crew show our introductory video to give guests an idea of what to expect on the water and key points to take away from each session. After the video the crew should take time to run through the collision regulations theory session before starting the practical sessions.
Collison Regulations
Our theory discussion on Collision Regulations should focus on three main points for guests to remember when enjoying their watercraft out on the water:
- Keep a good lookout around you at all times.
- When you see another vessel, slow your speed.
- When in doubt, turn right early and in an obvious manner (a large course alteration until you have open water in front of you).
The lookout should be a 360° observation as often as possible. Guests should also be mindful, when approaching vessels at anchor, never to approach the bow or stern of a large vessel as both pose blind-spot issues. The stern of other vessels in particular should be approached with caution as guests will be enjoying the water off the swim platforms.
You can play the following video for your guests to show them how to carry out all above recommendations.
For guest instruction on a topic like collision regulations, the crew should be wary of utilising yachting terminology, hence the use of “Left and Right” instead of “Port and Starboard” in this course. We need to make it as easy as possible for guests to remember: look around you, slow down and when in doubt, turn right. Overcomplicating the above can lead to confusion, especially for younger guests, and where language barriers exist. This is where gauging one’s audience as an instructor and adapting to your guest’s level of ability is key!
This first discussion on collision regulations will be followed up a little later with a practical simulation of:
- Vessel approaching head-on
- Vessel approaching from the right
- Vessel approaching the watercraft from the left. (This can be taught from two perspectives; in the event of a tender or watercraft approaching their PW from the left, they are allowed to maintain course and speed and indicate with their arm the intention of continuing on their course. However, the key is for them to keep observing the approaching vessel to see if they are going to turn and give way. Should the approaching vessel not alter its course, we then turn right and complete a whole turn over our wake and pass behind the vessel).
- Overtaking – Done once they can pass to the left or right (whichever side offers the safest option) and stay clear of the vessel they are overtaking.
The above content is for guest instruction purposes for crew on board. This training material acts as a refresher for crew on how to conduct the balance of the training. These videos are for crew, NOT guests
Instructors. Please view the instruction layout for each of the practical sessions in the following lessons.
Once the crew has completed the paperwork with the guests, PW overview video, and theory/video session on collision regulations, we can start the practical sessions, the first of these being helm station familiarisation.
Here we show guests:
Where the kill cord is attached, how the PW engages astern, what to see on the digital display and where to board the ski should we fall off. Test the throttle for immediate snap back into position if released and show guests the ski will not start if we are holding in the throttle while attempting to start the ski. Show a kill cord demonstration to show the ski switching off when the kill cord is removed. Pulling the kill cord during normal ski operation should be avoided as this causes delays in controlling the ski (different types of kill cords cause delays for the ski to start) should the guest require propulsion to reposition the watercraft.
Communication with the crew is important, and if the guests see, smell or hear anything on the ski while operating now or in the future, please switch the ski off and signal to the crew by waving both arms. Further explanation of these three scenarios:
- If we see some plastic or any form of debris in the water, the ski will have limited propulsion. Switch off the ski and wave at us.
- If we hear the alarms on the digital display or any other unusual sound on the ski, switch off and wave.
- Finally, if you smell something unusual on the ski, especially a burning smell, switch off and wave at us.
Top Tip: With two or three skis onboard, leave one ski on deck for guests to gather around for orientation at the helm station. The tender and other PW should already be launched and in the water ready to go. Once this familiarisation session is complete, guests can be taken to the swim platform and issued with impact vests, kill cords, and an application of sunscreen. This provides the opportunity for the final ski to be lowered and taken to the stern of the yacht for our next practical session on slow-speed familiarisation.
Slow-Speed Familiarisation
With the guests gathered on the swim platform, the crew has the opportunity to show how to depart alongside another vessel.
When getting ready to depart from the swim platform or tender, we would like to see guests wearing impact vests with the correct amount of buoyancy, clipped and zipped up correctly. Crew can then issue the guests with the kill cord to attach onto at least two buckles or a strong point on their impact vest before correctly boarding the ski. Next, see they step into the centre seat with both feet, hands on the handlebars, and equal displacement of weight with feet in the footwells on either side.
Once they are on board the ski and sitting comfortably, the best posture is ankles in alignment with the hips and legs gripping the seat. We want our guests to have a four-step checklist they should complete before they start the watercraft.
- Attach the kill cord
- Engage reverse
- Turn the steering toward the vessel they are alongside. (NB some skis operate the same as outboards in astern so check how yours operate as the correct option here would be to turn away from what you are alongside).
- Before starting the engine, have a good look around for other craft and water users.
Guests can then practice a couple of slow-speed turns in forward and reverse before attempting the return manoeuvre to the main vessel.
For easy reference, we used one of our manual skis in the video below. If the crew has skis with the RiDE or IRB system please ensure guests know how to utilise the trigger systems to operate forward, neutral, and reverse.
Please review the SYSA guest video on departure and return processes:
How to Return
Like our four-step departure points, we would like to see guests practise returning to the swim platform once they have been out on the equipment. Teaching this method for returning to the main vessel after use lowers the risk of a head-on approach to the swim platform at speed and potential damage and injury.
Here we would like to see them:
- Decelerate to an idle speed from a distance away.
- Line up parallel to the swim platform or tender.
- Start to use reverse gear to slow down their speed.
- Come to a complete stop with a one-metre gap and switch off the engine, and
- The crew will be on standby to pass guests a line and assist disembarking the ski.
Please remember to offer guests an escape plan should their approach not go as planned. By simply engaging in astern and backing away, they can start their approach again, reducing the risk of a guest attempting to salvage an incorrect approach with the throttle.
Transit from A-B
The explanation of how we would like guests to follow us should include:
How to follow the tender, hand signals for communication when underway and what will happen once we reach our anchorage.
How we follow:
As you can see from the visual aid below, we want our guests to position themselves approximately ten metres off the right-hand side of the tender. They must stay on the right of the tender at all times and match the tender for speed and mimic any turns the tender does.
Their position should also be forward of the wake the tender is creating. Should the tender encounter any other vessels during this transition, we can shield our guests by taking avoiding action with a turn to our starboard side. This is where reinforcement of the hand signals we will be using for communication becomes so important!
Use of Hand Signals:
In order to effectively communicate with the guests while travelling from A to B, we must explain the hand signals.
- Stop–Switch Engine off.
- Come home – set up at the back of the tender, approach parallel at idle speed, use reverse to come to a complete stop a metre away, switch off the engine and receive a line from the instructor. If we are not happy with our approach, escape by going into reverse and try the approach again.
- Speed up/slow down (raising of hand/lowering of hand), and
- Turn to the right/left (straight arm to the right/straight arm to the left).
Once we arrive at our destination, we must see that guests adhere to our one-hour timeline. In some anchorages, especially off the coast of Italy and France, the depth of water is 50m plus. To reduce the risk of guests scattering in multiple directions while lowering our anchor, explain that when we arrive at our chosen destination, they will see us indicate the ‘engine off’ hand signal. This will ensure guests stay in close proximity to us while dropping the anchor. Lastly, we will show them the ‘come home’ hand signal; this is the safe slow-speed approach, parallel at slow speed, using reverse and attempting to keep a 1-metre gap.
Please test your guests’ understanding by asking them some questions:
- How will you follow the tender?
- What will happen when we reach our destination?
- What hand signals will you expect to see and their meaning?
The video below is to remind instructors of formation and hand signals.
Also see following PDF for instructors to use for explanations:
Stopping Distances
Separate the skis by being in the middle of the course with two buoys set up on either side of the tender. As you may be operating in deep water, the buoys the crew drop for the sessions may well drift with the wind, so position these buoys forward of the bow at least 25 meters to the left and right of the tender with legs between buoys of around 50-75 meters. We want our guests to experience a stopping distance into the elements (Wind) and with the elements. The exercise should be run at a comfortable planning speed – around 15-20mph.
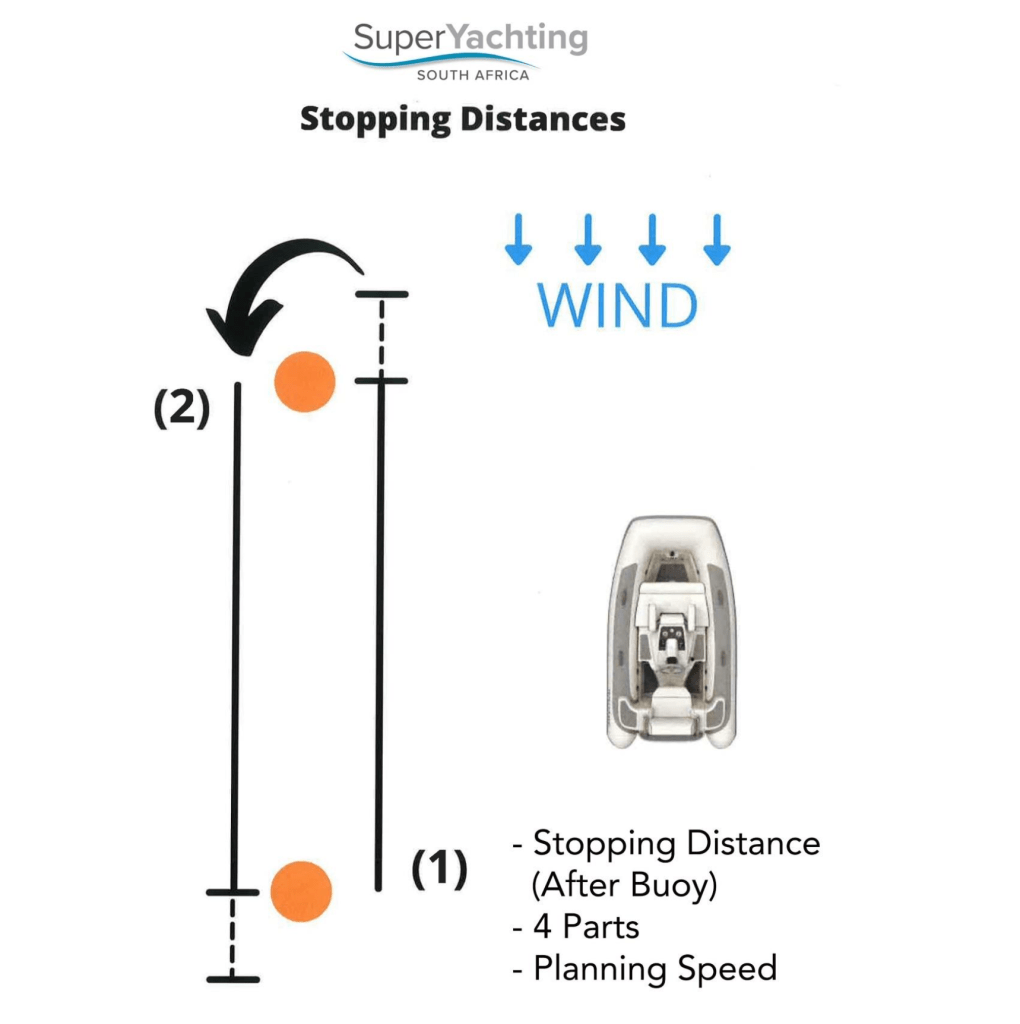

For novices, understanding the ski’s bow will lift as we start to accelerate is important to ensure the throttle is not released. Simply explain to maintain constant pressure on the throttle until the ski settles on the surface.
Ask guests to look at the digital display to note the speed we would like them to complete the exercise. Once planning speed has been reached for part one of the exercise (into the wind), guests should release their throttle when they reach the buoy at planning speed, count two seconds then switch the engine off, this is just to look after the engine. Once the engine is off, guests should attempt off-throttle steering to notice the limitations of steering and the distance it takes the ski to come to a complete halt. (Noticing this will help with the explanation into speed work in the next practical session). Then try the exercise downwind to notice the increased distance with the wind.
We can then escalate the training to get guests to attempt to see how good they are at gauging a stopping distance at speed, by trying the exercise this time with looking to release throttle, switch off engine stop at planning speed before the buoy to stop completely at the buoy into and with the wind. This will show how difficult it is to gauge a stopping distance at speed!
More than likely we will find that guests will overshoot the buoys in these last two exercises, this will then allow us to have a discussion regarding the session. Judging a stopping distance on a ski is difficult to do when going at any form of speed, which is why we have run this session. As a result once guests are looking to approach a person in the water, another craft or water user, or when returning back to the main vessel, they will remember to slow down early so they have a controlled approach speed with a minimum stopping distance.
When guests return to the tender at the end of the exercise they must utilize the slow speed parallel approach that was taught earlier, always good to remind them of their escape plan should this approach not work out the first time. Please consider with guests having gone at speed adrenaline will be flowing, get guests to pull out their killcord at the end of the session to reset themselves before returning to the tender.
The crew should demonstrate how to complete the task and check the guests understanding before sending them out to complete. Above were examples of the visual aids crew can utilize for the explanation of the task. Below is the Instructor video to show the distance of legs, buoy setup position and how the exercise can be run.
The instructor should pick a visible position on the tender to show guests the stages of the exercise, having a start hand signal such as raising both hands up and dropping them with indicating start. Instructors/Guests should always be vigilant of traffic in the area and be ready to call guests back to the tender should the need arise.
See Instructor refresher video below:
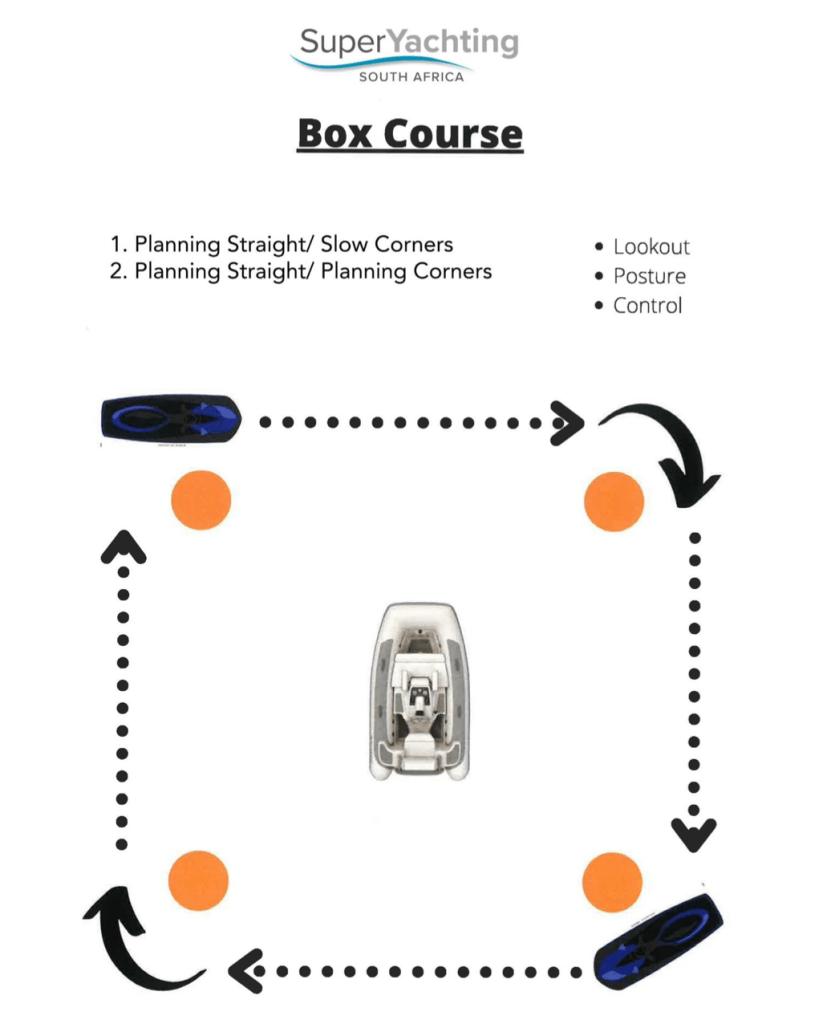
Planning Straights/Slow Corners/Planning Corners
Most accidents happen as a result of not maintaining a proper lookout when using personal watercraft and turning at speed. This becomes our emphasis during this training session.
Lookout
On the visual aid below, we can see that the tender is positioned in the centre of the square we have created. The first key teaching point we see is a reference to Lookout. Here we want guests to look at the tender when approaching the corner, this way the instructor can stay in control of the exercise at all times, the instructor can utilize hand signals to slow down a guest or stop the exercise.
Look out for other vessels or obstructions when planning to turn. Finally from a lookout perspective, we may well have another ski completing the exercise at the same time, here we want guests to take note of where the other ski is. Preferably we want the guests to stay opposite to each other at all times, but keeping a minimum of one full leg between buoys will also work should we run with three skis at a time.
Posture
Posture is another key teaching point, a visual reference to someone on a Ducati motorbike vs. someone on a Harley Davidson shows the difference between good and bad position on a watercraft. Watercraft are prone to slip, grip and flip at higher speeds. A good posture would include having one’s ankles in alignment with the hips, legs gripping the seat and a straight back with slightly bent arms.
Once we start to turn into the corner the guest must lean in the direction he is turning. The more we lean, the better the PW will grip into the corner. For this reason, we run this session in two parts, planning straights and slow corners – here the guests can build up confidence by decelerating off the plane to take the corner at a fast walking pace, versus part two of the exercise where we are looking for good acceleration through the corner for planning corners.
Control
Control is a reference to using the throttle correctly. We would like guests to decelerate as they approach the corner then look to accelerate as they lean and turn through the corner and back into planning speed again. During the stopping distance session covered previously, guests will have noticed that without throttle there is very limited steering and turning, this reinforces the need for throttle in the corners.
The instructor must make the square large enough for guests to enjoy building up momentum in the straights between each corner, this will also assist with group control. Position the tender in the centre of the square and ensure at the end of the session the guests pull their kill cord and wait for the wake which has built up in the centre of the square to dissipate before getting the guests to return. This is a very important point to remember to explain and demonstrate!
Remember:
Lookout
Posture
Control
Instructor refresher video below:
Collision Regulations, Paperwork, Maintenance and Lessons Learnt
Collision Regulations
Our aim is to have guests identify if a risk of collision exists, by keeping a good lookout at all times and being able to correctly avoid other water users.
The instructor sets up a box with the buoys set up about 75m per leg. (See Visual Aid Below) The bigger the course is, the easier it is to drive the tender and to simulate early avoidance.
Explain that Guests are to make their way around the box in a clockwise direction and at an idle speed. It is of utmost importance for the instructor to explain that after each scenario and the appropriate avoiding action, guests must continue on the leg they are on toward the next buoy staying in a clockwise rotation around the square. This will ensure that guests stay opposite to each other and from a tender driver perspective we can stay in sequence.
Please see the instructor video below, where we explain how to run the session and ensure we have completed the four scenarios with each guest.
The instructor is to intercept the PW’s to practice:
• Head-on,
• Approach from the right,
• Approach from the left, and
• Overtaking.
Before sending guests off to their start position, check that the guests have a clear understanding of what to do in each situation. Simplify this questioning without terminology, for instance; I am coming straight toward you what will u do?… I am coming from your right, what will you do?…
For the tender driving, set yourself up in an anti-clockwise direction in close proximity to a starting buoy and show guests the start hand signal. Build up the tender speed to a fast walking pace for good control and approach the first ski head-on. Once the first ski has turned to the right we will arrive at the next Buoy as the other ski is also arriving on the next leg, here again, we can simulate head-on with the next ski.
After this, we want to focus on one ski at a time with an approach from inside the square out (this will be an approach from the right of the ski where they will turn and give way) the tender can then turn to the right and head outside the square to approach this same ski from the left.
Following this, we do the same two manoeuvres with the second ski. When practising these crossing situations, make sure we aim forward of the bow of the PW’s when approaching. The last session will be a simulation of overtaking, just like with the head on scenario we can get both skis done. We turn the tender and start to make our way around the course in a clockwise direction and give our guests the speed up hand signal.
To save on time run this exercise with two guests on a PW so passengers and riders can swap over.
Key Points:
- Clockwise and after avoiding action continuous around the box,
- Idle Speed,
- Group control, stay opposite,
- Hand signals,
- Confirm Theory from earlier with each scenario in no particular order, and
- Where to start (Remember start Hand signal).
Practically, ensure the tender is in close proximity to the starting buoy in an anti-clockwise position when the exercise starts, to stay in sequence.
In Summary, three key points:
- Good Lookout,
- Safe speed, and
- Right is Right.
Below is the session run with views from onboard the tender, Drone from above and onboard PW view. Note the size of the box, this is vital for an easy drive for the instructor and to show early avoiding action. Note the position the tender starts from and the speed of the tender for good control and turning ability.
See Visual Aid below as well:
Box Course
- Clockwise
- Slow
- Confirm Rules
- Hand signals
- Opposites
- COL REGS

Paperwork, Maintenance and Lessons Learnt
Instructors to take ownership of the entire program on board. This will include risk assessments, safety briefings, equipment maintenance and hours of use.
Crew need to ensure that the compliance of onboard instruction is adhered to. This will entail keeping a detailed file on board of all areas of operation and the detailed assessments of each anchorage where practical sessions are carried out. The crew will also be required to keep a list of certificates issued, maintenance logbooks and safety briefings.
Risk Assessments
Yachts tend to move from anchorage to anchorage frequently with guests, each new anchorage requires an assessment to be completed, as the Senior crew on board will know the next destination of the yacht, this allows the instructor to be proactive and review the next anchorages rules and regulations in advance. This will also ensure that there are no delays for the guests to operate the skis on arrival.
Refer to the local Almanac/Mediterranean Yachting pages for information on areas of operation, distances to maintain from shore, additional equipment (helmets) to be carried when operating and any no go areas.
Please see example of Risk assessment below:
By completing these assessments, the crew have comfort in knowing the areas potential hazards, depth of water, speed zones etc. which all leads to safer guest operation on the skis.
We then follow up this risk assessment with a guest safety briefing on each new anchorage.
Safety briefings are verbalized to guests on each new anchorage, remember this is also an ideal opportunity to reinforce key points from the training that the crew would have completed with the guests. Concepts on how to return and approach the swim platform parallel and slow after playing on the skis, if the guests hear, see or smell something on the ski that concerns them to switch off and wait for a crew member to assist or the key points for encountering another vessel out on the water and remembering to turn right.
Maintenance Logbook and Equipment Expiry Dates
A maintenance logbook for hours of use of the equipment should be used hand in hand with the manual on the ski. This will show when various services should be carried out on the skis based on the hours of use. The crew will also get good details in the manual on troubleshooting and how to winter over the ski so the watercraft will be ready to go for the next season.
All these oil changes, filter changes etc. should be logged and kept in an equipment maintenance logbook.
The crew must also keep a record of the on board equipment such as fire extinguishers and flares, this way services of equipment and replacement of emergency equipment can also be kept on top of.